Content Customization
Custom image width
The plugin supports setting width of images the same way you would do in Obsidian.
If you want a transluded image to have a size of 200 px, you would add the following:
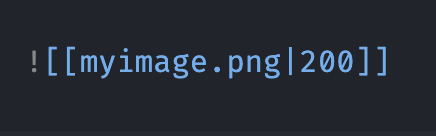
Your image should then be rendered with a max width of 200 px in your site.
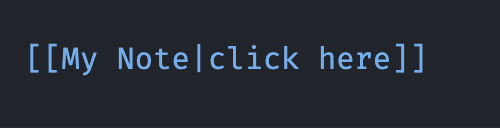
Custom link title
The plugin supports setting a customer title the same way you would do in Obsidian.
If you have a note title My Note , but want a link to display click here, you would use the following syntax:
Tranclusions
By default, transclusion of other documents just renders the content as is. If you want to also include a heading on top of the transclusion you can do so by using the pipe character:

This will add a h1 header with the value "Heading" at the start of your transclusion.
If you want the header to be equal to the title of the transcluded document, you can use this custom syntax:

This will replace the heading with the title of the transcluded document when the note is published.
You can also use the title syntax inside other text:

Specifying heading level
You may also specify what heading level you want your transclusion to have. If you want the header to be a h2, you can use this syntax:

h4 would look like this:

Default behaviour
By just using regular translucion, no header will be added:
It's also worth noting that transclusions do not need the dg-publish attribute.
They behave the same as an image. If you transclude something into a document, and publish that document, everything that is transcluded in it will be published as if it was part of that note.